Introducing Asterisk Phone Systems – Installing Asterisk IVR Prompts
Last time around, we introduced the topic of Interactive Voice Response menus and took a look at how you can record your own customised prompts, quickly, easily and affordably, which means it is now time to have a look at how we can actually export and install our custom IVR prompts within our Asterisk phone system.
Bitte akzeptieren Sie die Marketing-Cookies um ein Video anzuschauen
COOKIES AKZEPTIEREN
Getting Your Recordings Ready For Export
In order to install your new prompts in Asterisk, you will need to first export them from your sound editing software. However, before exporting your IVR prompt recordings, there are some best practice guidelines to follow first.
Before starting with this process, there are a couple of things to be aware of. Firstly, the steps outlined below are for making your prompt files ideal for ISDN quality. That means that when you get your studio to make your recordings, get them to make them in the highest quality available. Secondly, one you have the high quality original files, keep a back up. This is because once you have completed the steps below you will not be able to reverse them, meaning should you wish to have higher quality prompts for for example HD codecs in the future you will need to use the original backup files to generate these prompt files.
Mono vs Stereo
The first step is to convert your recording from Stereo to Mono. The reason here is that one a telephone, it is highly unlikely that you will ever have access to stereo sound quality as telephones are mono aural. Another reason for doing this is that by using the microphone, the recording was made in mono anyway. You could record your whole project in mono, but should you wish to mix in music with your prompts then it is best to leave the project in stereo and then convert the project to mono once you are happy with the recording.
Should you be, like us, using Audacity then splitting the track to mono is very straightforward. All you need to do is select “Split Stereo to Mono” via the drop down menu arrow icon on the left hand side of your track as illustrated below:
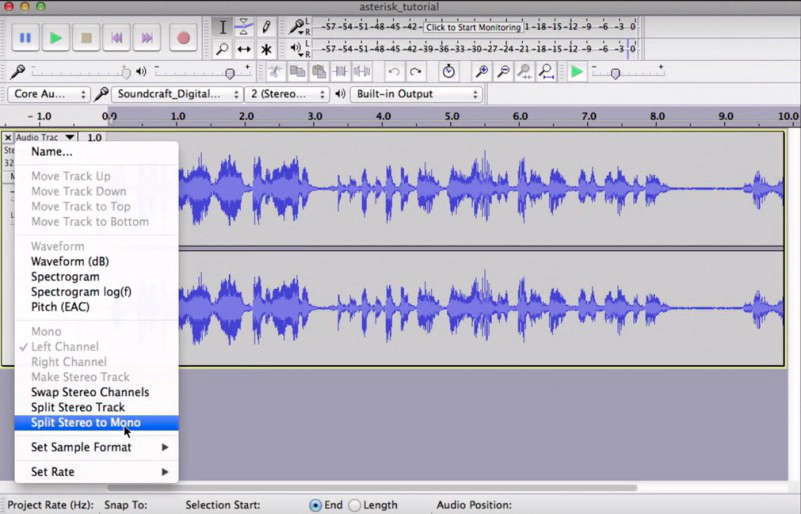 Asterisk IVR prompt recordings with Audacity
Once the tracks have been split, you can delete your now surplus to requirements second recording track.
Sample Rates
Having made your recordings using studio software, the chances are that they were recorded using a sample rate of 44100 Hz or so. As the standard (non HD) audio codecs used for telephony purposes (alaw and ulaw) use a sample rate of 8000 Hz, we will need to down sample our recordings which can be done using the “Project Rate” options in the bottom left hand corner of your Audacity screen.
Quick word of warning, you need to be aware of the fact that once down sampled, the recording can not be up sampled so it is always a good idea to keep a back up. Once this step has been done, you will be ready to export your prompt and upload it to your Asterisk system. To export your recording, simply click on File and select Export Selected Audio. When exporting, the recommended format to use is .wav.
Copying Your Prompt to the Asterisk Server
Once the file has been exported and saved, it is now ready to be copied onto your asterisk server. One option for doing this is to use the scp bash command, although holistic tools are also available.
In our example, we used bash and the command as follows:
scp asterisk_tutorial.wav pcadmin@192.168.100.55
Where we are copying the file asterisk_tutorial.wav from the studio directory to our Asterisk system designated by the remote location on 192.168.100.55. The next step is to then copy the file from the home directory to the asterisk sounds directory using the cp command in the Asterisk CLI as follows:
/var/lib/asterisk/sounds# cp /home/pcadmin/asterisk_tutorial.wav
Please note that in order to do this you should be logged in as the root user. For a more detailed description of using the cp and scp bash commands, take a look at computerhope.com
Testing Your Recording
In order to test that everything has worked correctly, we recommend creating a new extension in your dialplan from which you can playback the file. In order to do this, simply access your dialplan and in the phones context simply add a new extension as follows:
exten => *666,1,NoOp(playback)
same => n,Answer
same => n,Playback(asterisk_tutorial)
same => n,Hangup
It is also important to note here that you do not need to include the file format, as Asterisk will identify and use the most suited format according to the codecs being used.
Now all you need to do is reload your dialplan, make the test call and listen to the prompt. A top tip from Mathias here is to always listen to prompt of your target system as it may sound great on your stereo device, thats all well and good but you really should grab a phone or softphone, hook it up to your Asterisk and use it for testing as this will provide you with a much better idea of how the prompt will sound once it is being used in a productive system.
Should you not be happy with your prompt for whatever reason, don’t panic. If it is too loud for example, simply go back to the original unedited project file and start again, reducing the volume until you are satisfied. But remember – always keep a back up of the unedited file so you can make changes as needed!
Final Word
A well-configured business phone system that oozes useful tools, delivers excellent audio quality and intuitive call flows will leave callers with a highly professional impression. The configuration options, available applications and how well they are utilized will have a decisive impact on how professionally you manage your calls and therefore how your customers view your company. The switch to a pascom VoIP phone system solution provides the opportunity to not only upgrade your internal employee collaboration but also to redefine your business telephony.
If you would like more information regarding pascom and our Asterisk based PBX software, please visit our website or give the pascom team a call on +49 991 29691 0 to discuss your requirements and get started within minutes using our free hosted business VoIP phone system edition.
Until next time – Happy VoIPing!