Documentation
pascom Cloud Phone System Documentation and Release Notes
Custom Prompts and Music on Hold
How to import and use custom prompts and music on hold in teams, IVRs and actions.
Training Video
Concept
During a telephone call, there are a number of points at which you situations where you could use prompts or music on hold. pascom phone systems already come with a number of prompt templates in both German and English. However, is normally better to create your own voice prompts or Music on Hold to welcome and guide your customers or inform them about your business hours. This is particularly useful for creating a professional impression and welcoming callers to your Contact Center or central switchboard.
If you prefer to create your announcements in a recording studio with the help of professional voice actors, please contact our sales team.
Configuration
Adding Voice Prompts
In order to add a new prompt to pascom, select > in the pascom phone system Web UI and click . Should you wish to edit an existing prompt, then select the prompt and click .
We recommend using a prefix when naming your custom prompts in order to maintain a good overview and to be able to find them more easily later. This prefix could be something like CC-businesshours, where the CC stands for the company name “ChaosConsulting”.
Firstly, the “placeholder” for the prompt will be added.
Under the upload column, you have the option to upload your existing prompts should they be available.
After the successfully uploading and saving the custom prompt, the play back symbol will appear in the Play column which enables you to listen to the prompt. If necessary, you can also create a backup copy of this prompt by downloading it to your PC via the download link in the prompt file column.
Backup your prompts
You can download all your prompts in a .tar.gz-packet by clicking on the Actions button within the prompts overview menu and selecting Export custom prompt files. Should you have an archive of existing prompts, you can upload these in one go using the Import an archive with promptfiles option. However, these prompts must also be packed as a .tar.gz-archive.
Recording Custom Prompts on a Telephone
Should you wish to, it is also possible to overwrite an existing prompt using your phone as the recording device.
In order to be able to do this, you must first ensure that the prompt has been “shared” by clicking on Share in the Shared column. Once this is done, a six figure Prompt ID will appear.
Now dial *50 in order to call the pascom Prompt System. By pressing 1, you will now be able to record a voice prompt. You will then be prompted to enter the prompt ID. After the beep you can start recording your voice prompt.
Once you have finished reading out your voice prompt, do not hangup but rather press the hash / pound (#) key in order to save your voice prompt. If you hangup, your prompt will still be saved but you will also record the sound of hanging up the receiver/handset, which is obviously not advisable.
You can playback your recorded voice prompt by once again dialing *50 to enter the prompt system and instead of pressing 1, simply press any other key. You will now need to enter the prompt ID and the corresponding prompt will be played back.
You can also listen to and download your Voice Prompts by using the pascom commander web UI. If the voice prompt is fit for purpose and no longer needs to be edited (re-recorded), click on the red X on the left of the prompt ID which will lock the prompt meaning it cannot be overwritten using the telephone function. By clicking the X, the prompt ID will disappear and should it be shared again in the future, a new ID will be generated.
Adding Additional Languages
As has already been described, English and German are currently available as the installation languages. However, further languages can be added according to your needs, through using the menu tab > and clicking on the button. Name the new language and enter the abbreviation code for the language.
Upon saving, your new language will appear in the languages overview list.
Managing Music on Hold
The recordings used for your music on hold can be managed in the > menu of the pascom web interface.
Always make sure you do not violate any intellectual property rights when using a particular song for your music on hold. Either use music by artists not covered by collecting societies (such as the German musical performance and reproductions rights protection society: GEMA) or pay the royalties. As the music you will be using is made publicly available by playing it to the caller, not paying the royalties incurs the risk of legal action against you.
https://www.musicfox.com has an excellent selection of Music on Hold which can be licensed for telephony purposes.
With pascom, you should select whole playlists and not individual songs which should be played. pascom comes with the playlist (class) called “default”. It includes song snippets created by Asterisk developers and can be used without having to pay any royalties to GEMA.
Once you have selected a playlist, > allows you to display or remove individual songs within the playlist.
Compatible formats are WAV and MP3 files.
By pressing the Add button you can create additional playlists to suit your needs. Which playlist is played can be adapted for several scenarios, e.g.under Team and selecting waiting music. This way, you could use specific background music referring to your ticket system for your support team or you can also advertise the latest promotional deals on your sales hotline.
Putting a caller on HOLD will always cause the default playlist to be used.
Creating and uploading prompts on your PC
In order to ensure the best possible recording quality, we recommend you to use a PC for the recording and then uploading the file to your pascom phone system. You can use almost any input format, as the pascom PBX will convert your audio file to its required format after uploading; we obtained the best results when using a standard WAV file as the source.
Creating Prompts with Audacity
Audacity is a good, platform-independent and free program you can use to create your voice prompts.

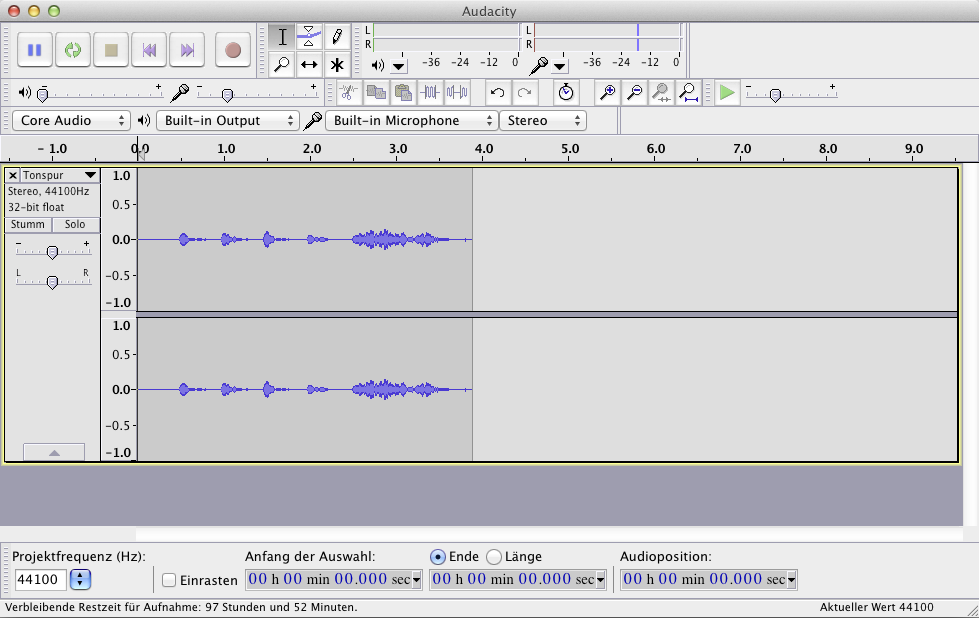
Using it is quite simple. Select your microphone (see drop-down menu “Built-in Microphone” in the screenshot), adjust the volume and press the red button to start recording.
Don’t worry if the recording is not perfect on the first try. Simply press the record button and repeat your text several times in a row. You can cut the recording later by marking the soundtrack at the desired points and pressing the DEL key.
Once you are satisfied with the output, select > and create a WAV (Microsoft 16-bit PCM file. If you want to edit your file later, you should save the project file as well by selecting > .
Including Background Music
You can also add background music to the prompts, such as a suitable jingle during the Christmas season etc. Audacity can handle several sound tracks at once.
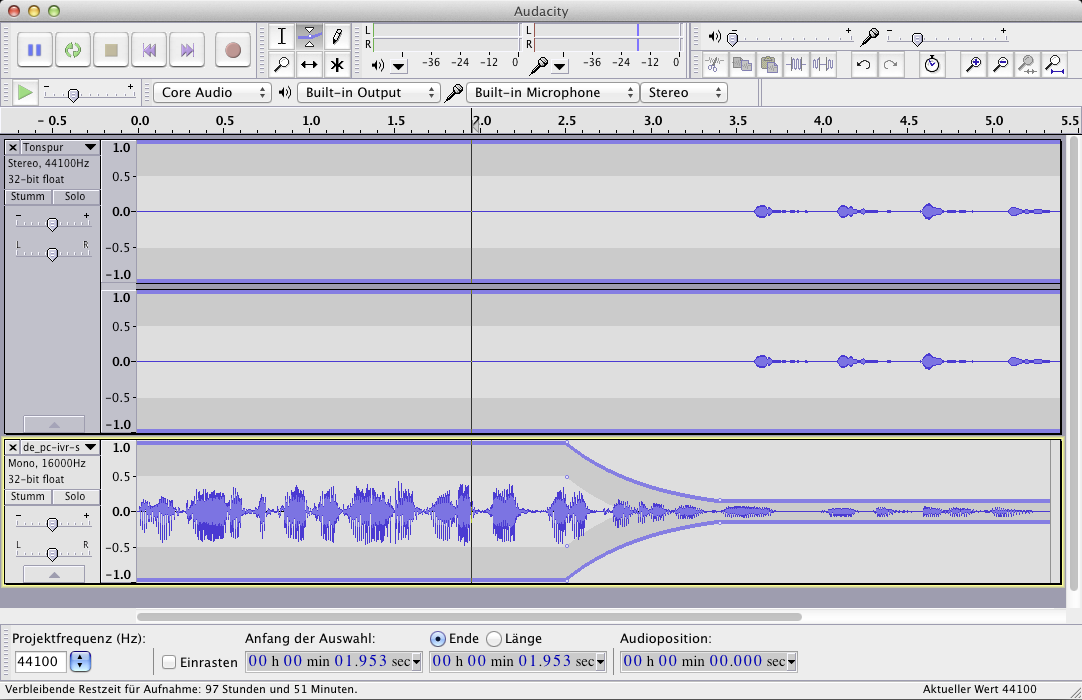
Record your prompts as described above. Then select > > . Choose the file that contains the desired music and import it. Audacity will then create a second sound track. If you press Play, both the recorded voice prompt and the song will be played.
You will be able to hear that the music is so loud it drowns out the the voice prompt. In addition, it might not be desirable for the music and the prompt to start at the same time.
To start the voice prompt a bit later than the background music, position the cursor at the beginning of the voice prompt’s sound track and add about three seconds of silence by clicking > . This way, the background music will start about three seconds before the voice prompt.
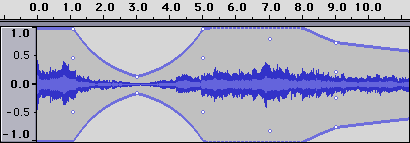
To reduce the loudness of the background music, use the envelope tool. When the envelope tool is activated while you position your cursor in the sound track and move your mouse up and down, you will notice you an change the volume of the sound track. Repeating this process in several more parts along the sound track will cause Audacity to create an envelope from all the selected positions, indicated by small white dots.

The result should look similar to this:

If you like the result, select > and create a WAV (Microsoft) 16-bit PCM file. The sound tracks will be merged automatically.
If you want to edit your file later, you should save the project file as well by selecting > .