The pascom client profiles are a new presence management feature that we have added to the pascom cloud phone system desktop and mobile apps. The profiles tool has been developed to enrich the end-user experience and allows the more precise management of how, when and which device you use to make and receive calls depending on your workspace, schedule and even workload.
Please accept marketing cookies to watch videos on our site
ACCEPT COOKIES
By using the pascom client profiles, users can control how they appear online and automatically change their preferred device, team membership, and follow me settings for any number of different scenarios, such as working from home, or in a meeting or even on holiday.
All the above could be done before, so why do we need profiles? Simply put, by using the pascom client profiles tool, a user can set up the profile once and then simply activate it each time they need it as opposed to having to individually adjust multiple settings each time their requirements change, for example, when they switch workspaces from the office to home office.
What’s more, the business world has become extremely hectic and communication channels are more complex and varied than ever before. We work from home, in the office and while on the go. We call, we chat, we share files, and we jump into video meetings and possibly even send a fax now and then. For each of those scenarios, we use different devices such as softphones, mobiles, tablets, and the odd desktop phone. We also have different expectations on how all these workspaces, devices and channels should work in harmony and we all feel the same pain and frustration when things don’t work as we want or expect.
That’s where the pascom client profiles deliver real benefit to each user as they allow every pascom app user to customize and manage everything precisely according to them, their needs and their preferred way of working in any given circumstance, as opposed to having to work in accordance with some predefined, rigid out of the box template.
How to setup, manage and use pascom’s new Client Profiles feature
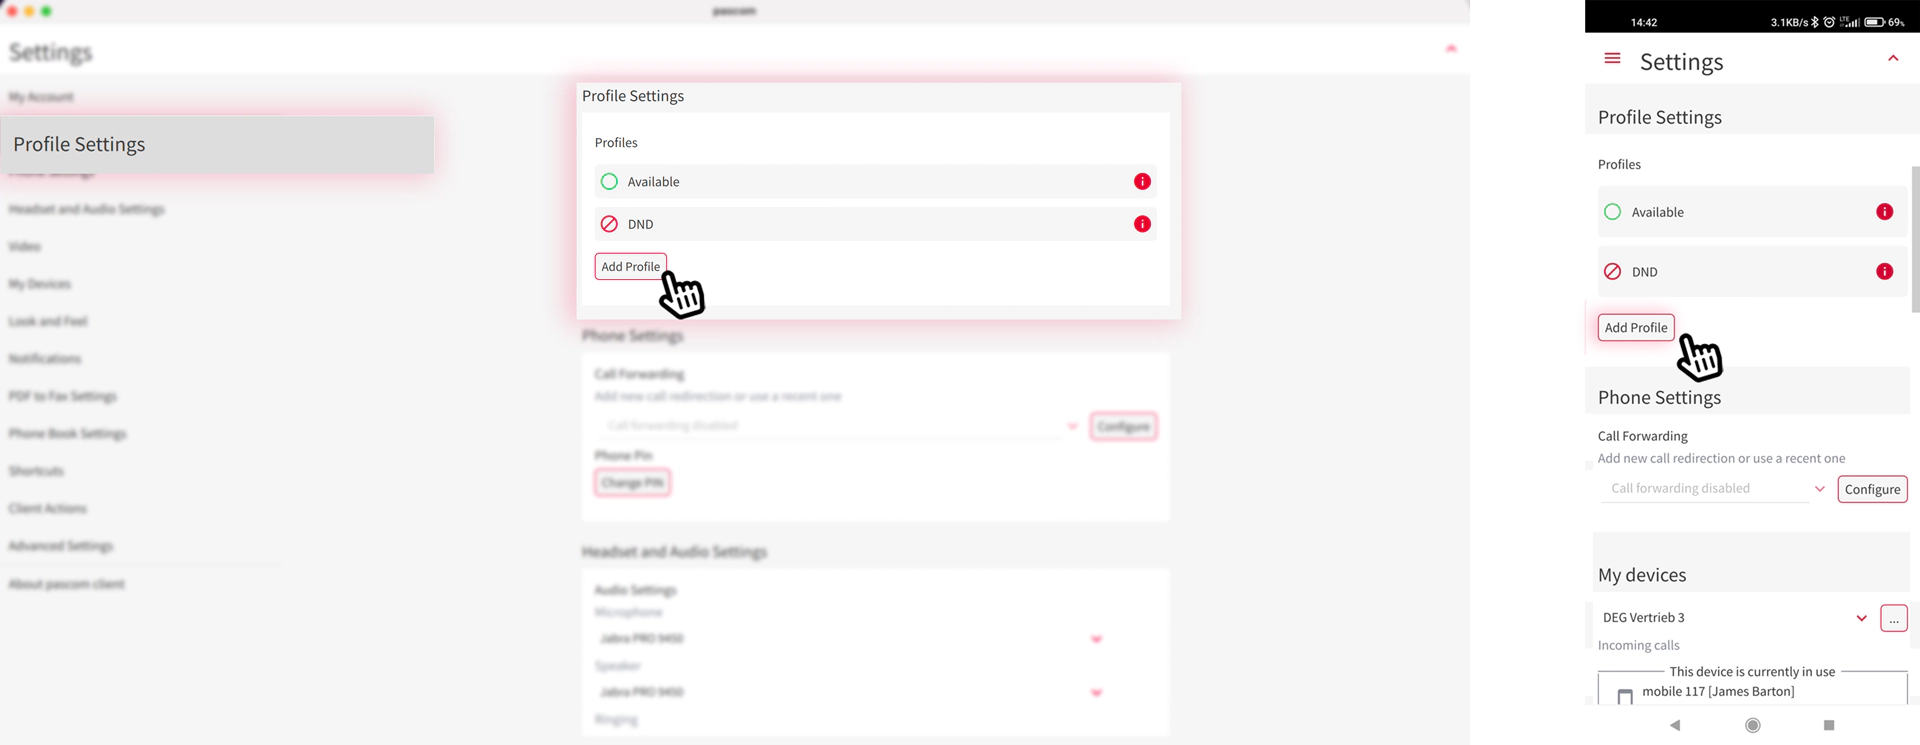
Before we go any further, it is important to know that there are two default client profiles that are available to you: Available and DND.
Selecting either one of these default profiles basically turns your devices on (Available) and off (DND). This may be what you expect, but for many users, this functionality is too simplistic, especially in the world of hybrid and mobile working. So, let’s look at how we can improve things and upgrade our profiles to really match our everyday work needs and to make things simple, we are going to use working from home and the office as an example.
Add a New Profile
To set up a new profile, simply open either your pascom desktop or mobile app, access the settings menu and go to the “Profile Settings” section:
Next, you will need to add a profile name - in our case “Home Office”. The profile name should be sensible and informative as not only does it tell you immediately what this profile is for, but the name is also displayed in the pascom apps to tell other users what your current presence/availability status is.
As we continue, you will see that you can choose a colour and symbol for your profile. Again choosing a colour that communicates your status effectively is essential, as it helps other users quickly identify what your availability is, particularly on smaller mobile screens. Our recommendation would be to use the colours “Green” for available and “Red” for unavailable. Similarly, the choice of symbol is crucial as it can communicate exactly what, where and/or how of your current workspace. For example, when working in home office, choosing the colour green and the house icon clearly shows that you are available and working at home.
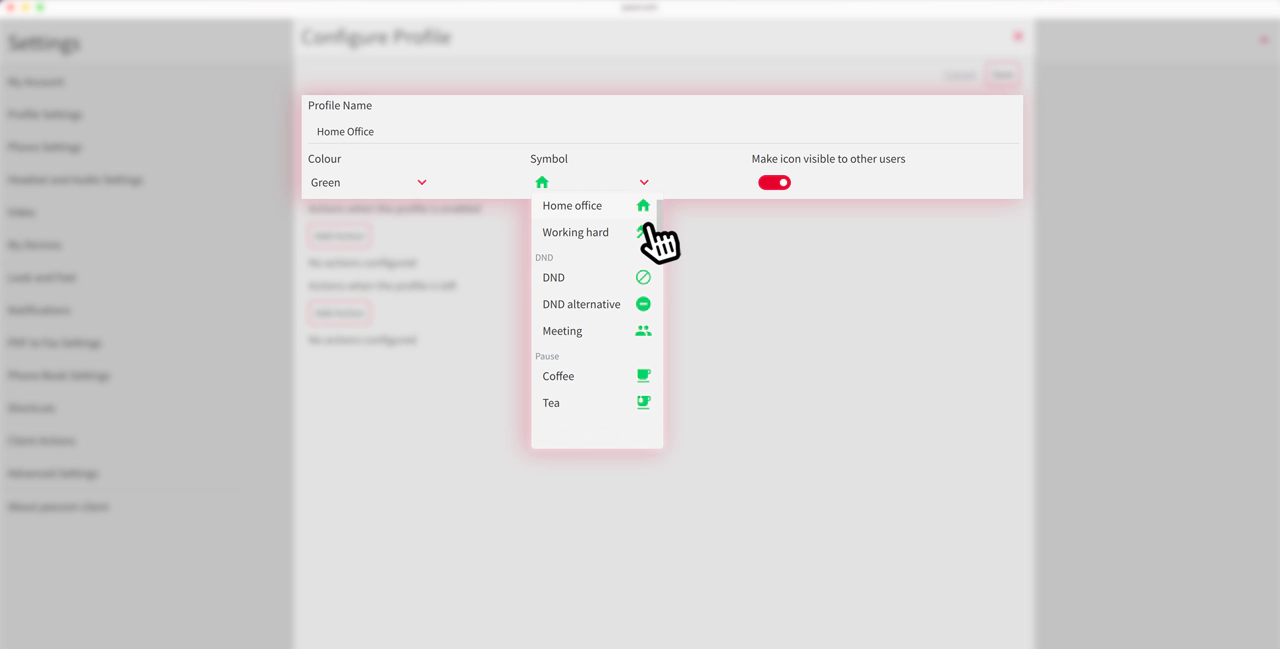
Another great example would be to set up a meeting profile. In this case, our suggestion would be “red” and either the “DND” or “Meeting” icons to show that you are currently not available and do not want to be disturbed.

Given that the icon provides a visual reference to other users to immediately understand another user’s current working situation, the “Make icon visible to other users” is turned on per default. While we do not recommend doing so, there are certain scenarios where being able to hide the icon is important.

If you press the Save button now, your new profile will be available to select in the desktop and mobile apps. However, the reality is that the profile will only change your status and add a colour and an icon to said status, but will not change anything in terms of how you make and receive calls. For this, we need to add some actions.
Add Actions to Your Profile
Adding actions to your client profile gives you the power to control every aspect of how you make and receive calls, from which device you use (FollowMe) to where you are working (workspace). With actions, it is even possible to manage the types of calls you receive according to your current situation. For example, if you are working from home, actions can be used to make your mobile your default device, GSM mode can be enabled if your home/mobile network connections are not overly reliable, and delays can be added for team calls to make sure you can answer them on your desktop softphone and headset etc.
Example Home Office Profile Configuration
Before we go further in configuring our HomeOffice profile, it is important to understand what each action does. For this purpose, a detailed explanation can be found in the define new action section in our pascom App User Guide.
To add an action, simply select the “Actions” tab from the top options and then press the “Add Action” button. If your client is not the newest version, the Add Action button will be listed below the Profile Name section.
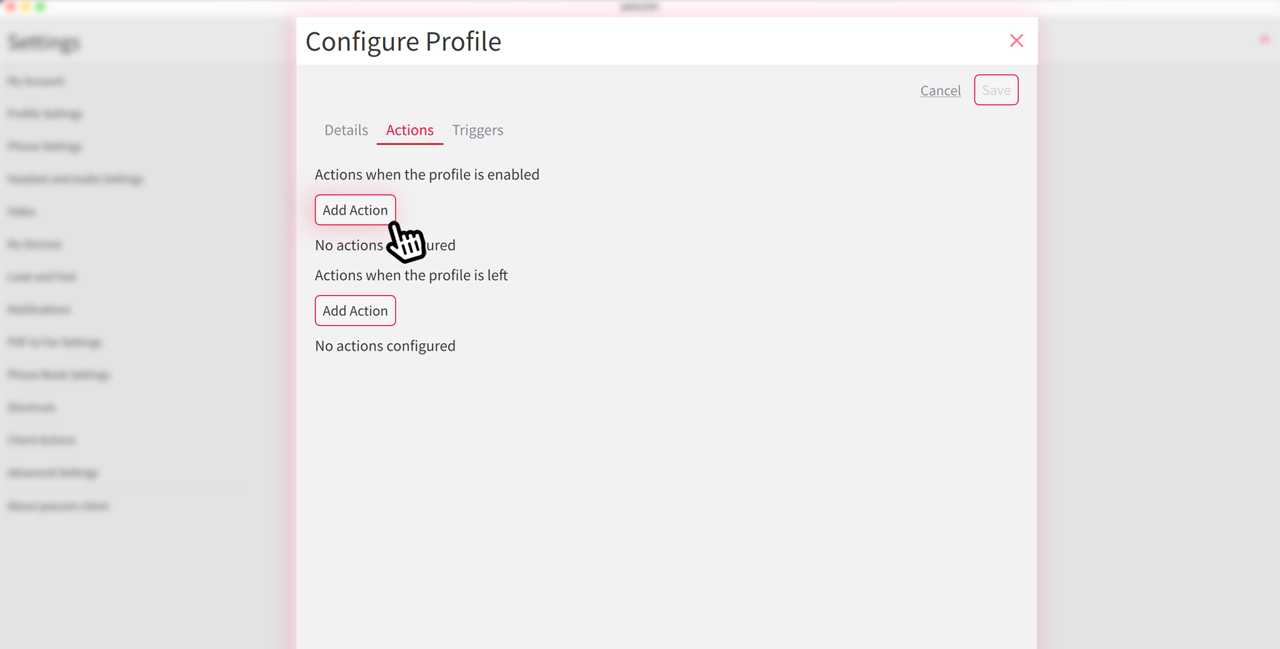
Your client should automatically update, giving you the latest in usability, functionality and security. So if your client is not the latest version, it means your admin has disabled this feature and you should speak to them.
Either way, clicking the “Add Action” button will open the screen shown below and you can now work through the list from top to bottom or however it makes sense to you. For me as an experienced pascom user, the first action I would set up is to change my workspace to my Home Office. The reason I do it this way, is the following actions are specific to my workspace, so it helps me think about what I am trying to achieve with this profile.
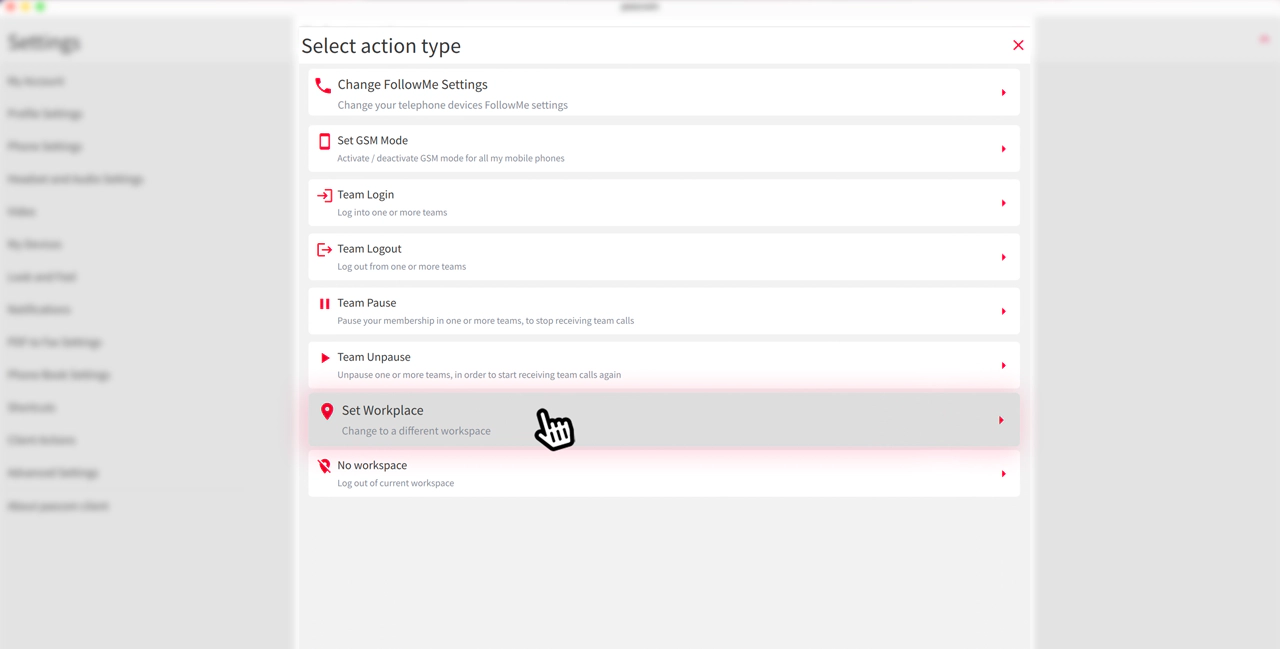
If you do not already use workspaces i.e. Office and Home Office, we highly recommend doing so as it makes life so much simpler. Firstly, by working with workspaces, it is possible to assign devices to a workspace as opposed to a user. This enables features such as HotDesking which allows users to log in and out of a workspace and automatically take over all workspace devices. Moreover, we can also save more time in our profile configuration as well as we can ignore devices that are assigned to different workspaces.
Next, I would configure my FollowMe settings to manage my devices. For example, I can configure my mobile device to have a delay. To do this, I simply choose the follow me action and select “Mobile” from the device drop down list:
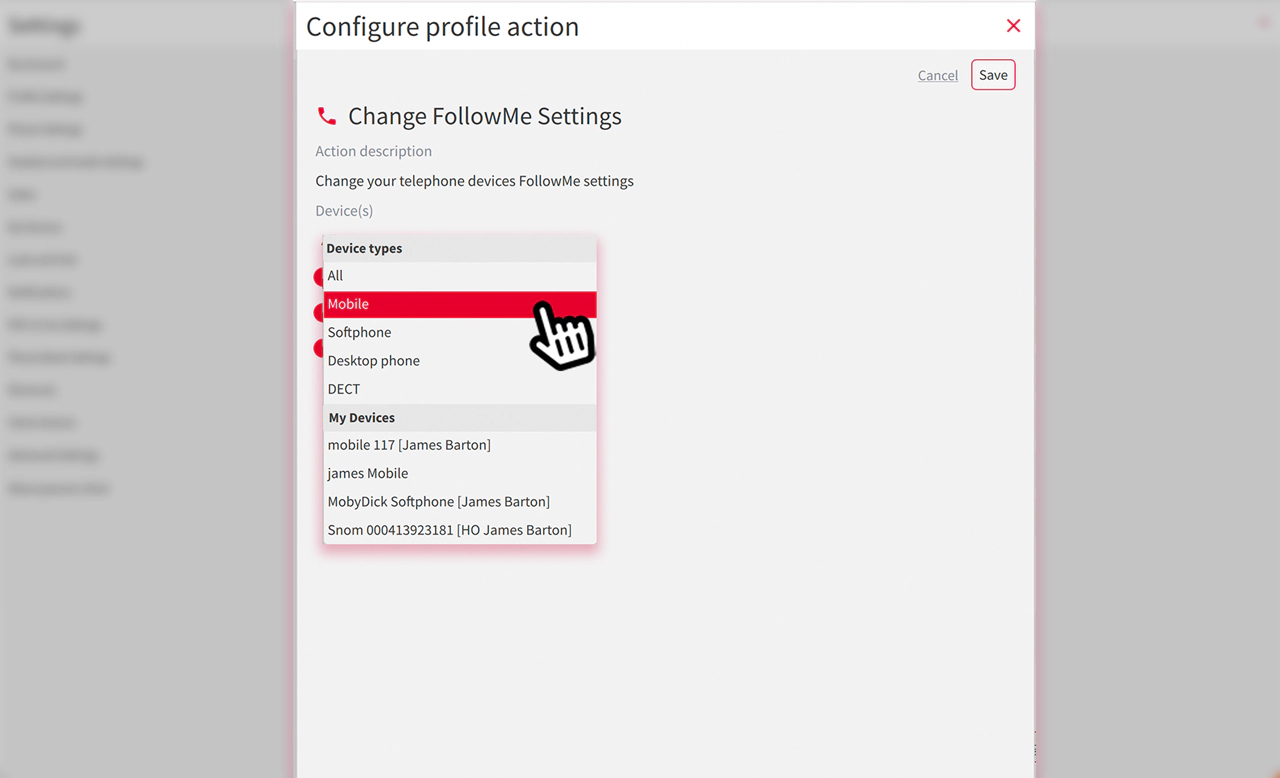
Now that my Mobile is selected, I can configure any ring delays according to my preferences. In the example below, I have added a 3 second delay to Internal Calls, and am about to do the same to External Calls (calls direct to my office number). I have also toggled Team Calls to off (Red is on), meaning I will not receive any calls on my mobile app that arrived at my extension DIRECTLY via a call queue (sales, switchboard etc). Colleagues will still be able to transfer these calls to me.
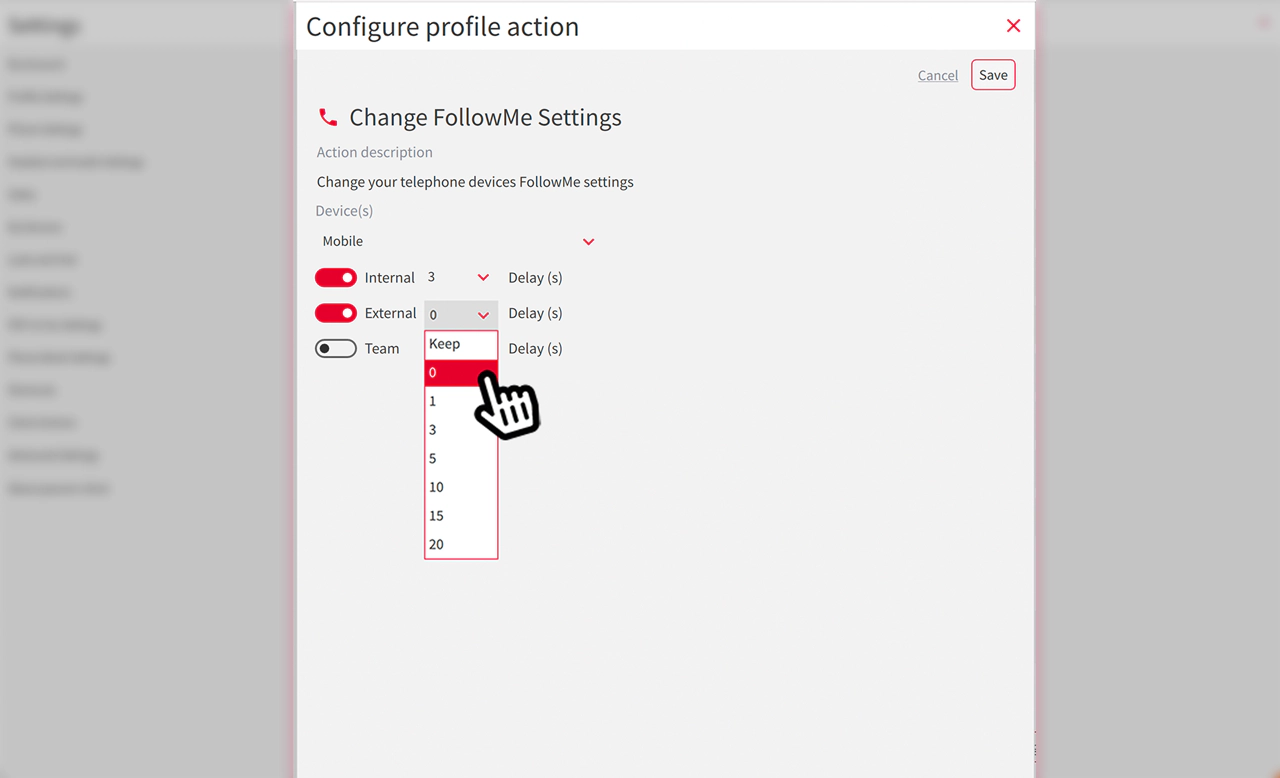
Meanwhile, I can setup my pascom softphone app on my laptop will continue to ring as normal. This will ensure that both phones will not ring at the same time and provides extra comfort if, for example, I am currently helping the kids with their homework and don’t want two phones ringing at the same time being a distraction.
In the end, your configuration will look something similar to this:
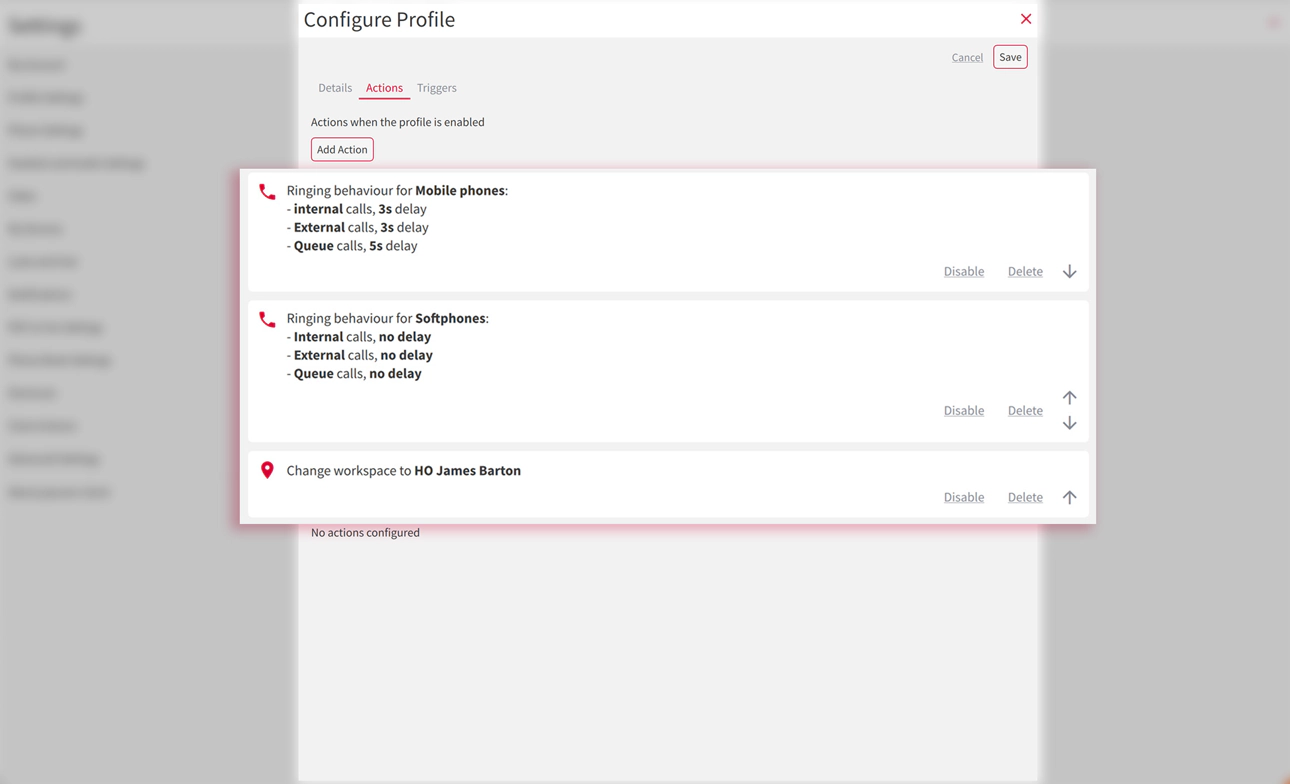

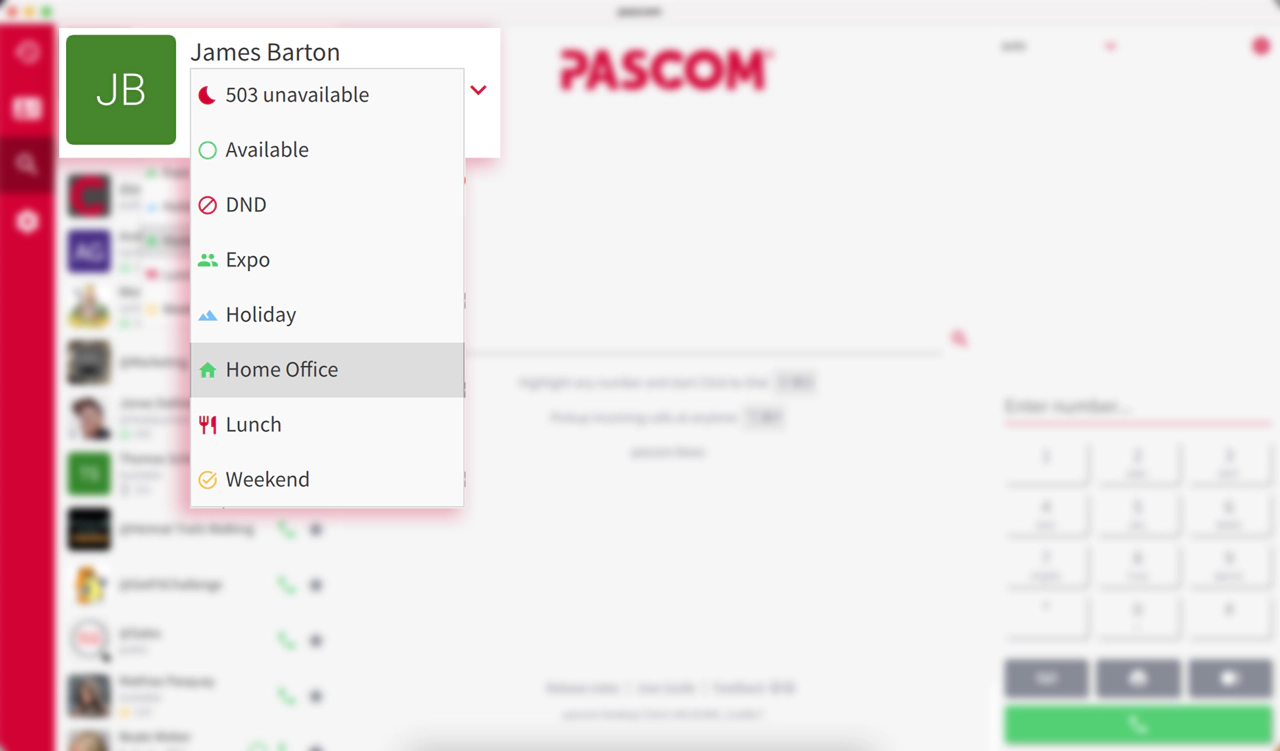
To finialise your settings, all that remains is to press the Save button. This will save your profile as the associated actions, so that when you need to activate the profile in the future all you need to do is select it as you would normally change your online presence status:
So that’s it, my perfect HomeOffice setup that works for me. However, should you need or want to, you can go even further. Options such as pausing or logging out of specific teams can be setup if, for example, you do not wish to receive calls via your company’ sales hotline.
We’re here to help
If you have any questions about our new profiles feature, any other pascom app features or the pascom cloud phone system, then we’re here to help, so just drop us a line and discover how we can help your business prepare for tomorrow’s workplace. Call us on +49 991 291691 0 and get started with your 30 day free cloud phone system trial today.